Fresh-Pressed Olive Oil Club

The Olive Oil Hunter News #11

Garlic- and Pepper-Crusted Beef Tenderloin Recipe, Spotlight on Black Peppercorns, How to Dry-age Beef at Home and Buying the Best Garlic

Over the course of 20 years traveling the globe—originally as a food, wine, and travel writer and more recently as the Olive Oil Hunter®—I’ve marveled at the rich flavors I’ve experienced across dozens of cuisines and cultures. Whether I was dining at the top restaurant in Paris or sitting down with farmers’ families for simple home-cooked food, every bite was a revelation that fine-tuned my palate. What common denominator did all these meals share? The freshness of the ingredients. Just as I’m a fanatic when it comes to sourcing the freshest extra virgin olive oil, I have a similar passion for intense spices—spices that are deep and bright and can transform even an ordinary dish. If you saw emails about my new harvest-fresh Spice Collection earlier in the week (if not, check your spam right away!), you know that I’m excited to share my spice knowledge and know-how with you—how to use spices for maximum flavor and to expand your cuisine repertoire, starting with this issue of The Olive Oil Hunter Newsletter and in future ones, too.

If I had to pick just one spice, it would be black pepper, and that’s why it’s up first. Though it’s the most widely used spice on the planet, in the U.S. it can be an afterthought rather than the star of a dish. That’s not the case with the two recipes I’m sharing with you—one is perfect for the most festive meal of this season, and the other, just as delicious, is a meal you can make in minutes with just four ingredients. So, grab your grinder and let’s cook…

No matter what your preference for doneness, use an instant-read thermometer in the thickest part of the tenderloin to test. According to the experts at Thermo Pro, rare is 120º–130ºF; medium rare, 130º–135ºF; medium, 135º–145ºF; medium well, 145º–155ºF; and well, 165ºF. Keep in mind that when you take it out of the oven, it will continue to cook and can go up by another 5 degrees, so plan accordingly. 

A special note about garlic: When I buy garlic, I always buy organic and I always turn over the head to make sure there’s still some of the root network intact, a sign that it’s American-grown. Too often, Chinese imports are sold. Those are bleached in chlorine to artificially enhance their appearance. Another telltale sign is a concave area on the bottom, free of roots.

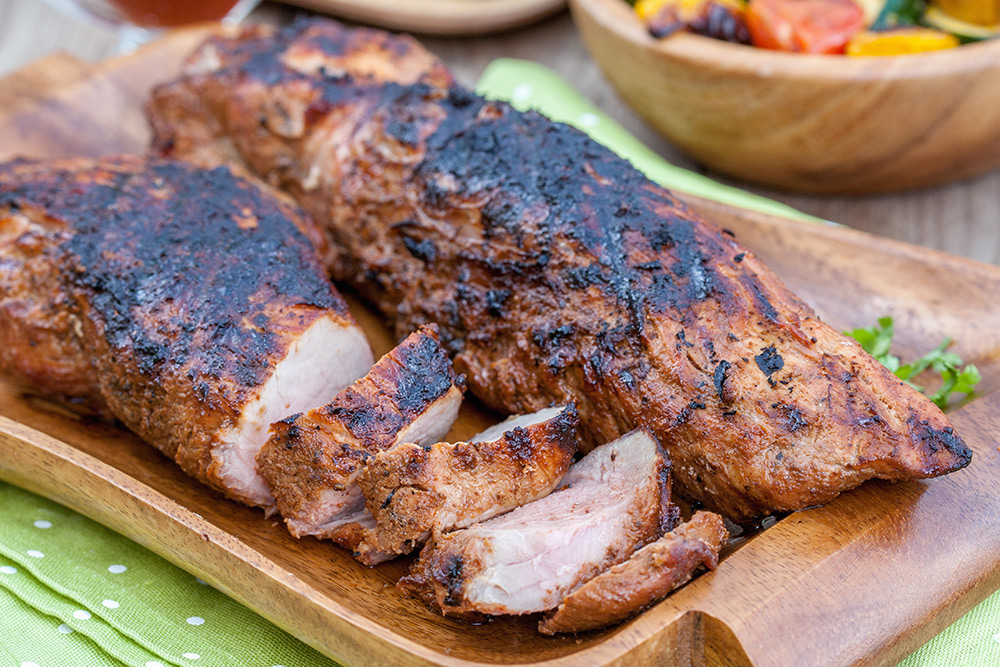
Garlic- and Pepper-Crusted Beef Tenderloin

  • The Olive Oil Hunter News #11 Garlic- and Pepper-Crusted Beef Tenderloin

    Ancient Indian and Egyptian cultures used peppercorns as an anti-inflammatory and analgesic. Rich in antimicrobial compounds, pepper acted as a preservative, too. Contemporary research has found that there’s science to back up those early practices, thanks primarily to the powerful compound piperine, the source of its spicy punch. It has enzymes that help the body better absorb both conventional and herbal medications—turmeric supplements often come with piperine for this reason. There’s even the possibility that it could play a role in the development of medications to combat illnesses as varied as Parkinson’s, cancer, and depression. According to studies in Phytotherapy Research and other journals, although research is still in the early stages (most has been done only in the lab), one day there could be value well beyond pepper’s great taste for making it an important part of the diet.

    Ingredients

    • 8 cloves garlic, peeled 
    • 2 tablespoons kosher salt
    • 1/3 cup extra virgin olive oil plus 2 tablespoons for searing 
    • 1 tablespoon freshly cracked black peppercorns
    • 2 tablespoons fresh thyme leaves
    • 1/4 cup fresh rosemary needles from a 3- or 4-inch sprig 
    • 2 tablespoons coarse grain mustard
    • One 3-pound center-cut beef tenderloin, trimmed 

    Directions

    Step 1

    Preheat your oven to 450ºF. In a small food processor, combine the garlic and salt and process until the garlic is finely chopped. Let it rest for 10 minutes for the powerful allicin in the garlic to develop. Add the olive oil, black pepper, thyme, and rosemary, and process until the herbs are evenly chopped. Stir in the mustard.

    Step 2

    Heat a large cast iron skillet or Dutch oven on the stovetop. Add the remaining 2 tablespoons of olive oil and heat until it shimmers. Sear the beef tenderloin on all sides until nicely browned, 3 to 4 minutes per side, turning with tongs. Transfer the meat to a cutting board and let cool slightly.

    Step 3

    Coat the meat evenly on all sides with the garlic, pepper, and herb mixture. Transfer the tenderloin to a meat rack set in a roasting pan. Roast the tenderloin until the internal temperature reaches desired doneness on an instant-read thermometer, about 20 to 30 minutes (depending on its thickness). So that the juices will redistribute, let it rest for at least 10 minutes before carving.

    Yields 8 servings.
Healthy Ingredient Spotlight: Black Peppercorns

Healthy Ingredient Spotlight

Black Peppercorns

The origin of black peppercorns (Piper nigrum, part of the Piperaceae family) can be traced to Kerala, a province in southwest India where its written history goes back at least 4,000 years. Once the most coveted spice in the world, peppercorns were the original “black gold.” 

Black pepper has a place in almost every cuisine, as you can tell from the fact that it’s part of spice mixes from Cajun blends to the French quatre épices to India’s garam masala. It’s great on your favorite proteins—beef, pork, duck, game, shrimp, and eggs. And it adds an indelible flavor to terrines and patés, stock and sauces, spicy desserts like gingerbread and poached pears, and even mulled wine. 

It’s important to always grind your own peppercorns fresh as needed. If you require a large amount, place them by the tablespoon in a coffee bean grinder and pulse until just shy of a powder. When using black pepper as a crust, you want to crack the peppercorns into small and large pieces.

Healthy Kitchen Tip: Dry-aging Beef at Home

Healthy Kitchen Nugget

Dry-aging Beef at Home

My favorite quick hack for dry-aging beef at home is to open the package a day in advance of cooking and place the meat on a rack over a sheet pan on the bottom shelf of your fridge (for food safety). The overnight dehumidification in the fridge concentrates the flavor of the beef and makes it more tender (this works well with skin-on chicken thighs, too). The next day, season and cook the beef according to your recipe.

For Your Best Health: The Many Uses of Peppercorns

For Your Best Health

The Many Uses of Peppercorns

Ancient Indian and Egyptian cultures used peppercorns as an anti-inflammatory and analgesic. Rich in antimicrobial compounds, pepper acted as a preservative, too. Contemporary research has found that there’s science to back up those early practices, thanks primarily to the powerful compound piperine, the source of its spicy punch. It has enzymes that help the body better absorb both conventional and herbal medications—turmeric supplements often come with piperine for this reason. There’s even the possibility that it could play a role in the development of medications to combat illnesses as varied as Parkinson’s, cancer, and depression. According to studies in Phytotherapy Research and other journals, although research is still in the early stages (most has been done only in the lab), one day there could be value well beyond pepper’s great taste for making it an important part of the diet.

Get More Recipes In Your Inbox!

The Olive Oil Hunter News #10

Dried Apricot and Cranberry Pilaf Recipe, Spotlight on Dried Fruits and Homemade Stock and Learn How Olive Oil Supports Heart Health

Do you feel a chill in the air yet? ’Tis the season after all! As we move into the most challenging holiday period in recent history, a great way to warm up and feel soothed is to enjoy healthier comfort foods. As public health experts are pointing out, we need to take steps to boost our immune systems by eating foods high in nutrients and by getting enough exercise, the latter being a challenge if you’re a gym rat and your health club is off-limits or you just want to stay safe by avoiding crowded indoor spaces. But there are work-arounds that make staying healthy more fun. Let me share all the details with you, starting with a sweet side dish.

Dried Apricot and Cranberry Pilaf

  • The Olive Oil Hunter News #10 Dried Apricot and Cranberry Pilaf

    Rice is the perfect vehicle for a wide range of flavors, both sweet and savory. I’m a fan of the subtle aroma of jasmine rice, but any long grain will work. Dried apricots and cranberries are evocative of the season and give this pilaf a sweet-tart taste, but feel free to use whatever dried fruits you like, instead of or even in addition to. When sprinkled on the finished dish, the fresh orange zest gives it a wonderful perfume. I love to use a Microplane grater because it makes such a fine zest, and it’s so easy to move over the entire surface of the peel to get all the goodness.

    Ingredients

    • 1 medium onion, diced
    • 2 tablespoons extra virgin olive oil 
    • 1 cup jasmine or basmati rice
    • 2-1/4 cups chicken broth, homemade or low-sodium canned
    • 1/2 cup dried apricots, chopped fine
    • 1/3 cup dried cranberries, chopped fine
    • 3 tablespoons sliced almonds, toasted
    • 2 tablespoons chopped Italian flat-leaf parsley
    • Freshly ground pepper to taste
    • 1 tablespoon or more orange zest 
    • Pinch of cinnamon, optional

    Directions

    In a covered saucepan over medium-low heat, sauté the onion in the olive oil until translucent. Add the rice, stirring to coat it in the oil. (This helps keep the grains distinct in the finished dish.) Stir in the broth and increase the heat to medium. Bring to a low boil, cover, and cook until the rice is tender and most of the liquid is absorbed, about 20 minutes. Stir in the apricots and cranberries and remove the pan from the heat. Put the cover back on, wait another 5 minutes, and then fluff the rice with a fork. Stir in the almonds, parsley, and freshly ground pepper. Transfer to a serving bowl and grate the orange zest right over the top. Sprinkle with cinnamon if desired.

    Yields 4 servings.

Healthy Ingredient Spotlight: Enhance Dishes with Dried Fruits

Healthy Ingredient Spotlight

Enhance Dishes with Dried Fruits

Dried fruits, such as apricots, cranberries, raisins, and prunes, are great for recipes like pilaf because they add flavor without unwanted moisture. They also make great fiber- and nutrient-rich snacks, especially when mixed with heart-healthy nuts like almonds, walnuts, hazelnuts, and pistachios. But remember that both dried fruits and nuts are very calorie dense, so measure out one-ounce portions rather than munching straight from a bag, suggests Harvard Health. When shopping, read labels to avoid brands with added sugars—with the exception of cranberries, they should be sweet enough on their own. For cranberries, look for brands sweetened with apple juice. You might also want to choose those made from organically grown fruits and avoid those with colorings, additives, and, especially if you have asthma, sulphite-based preservatives like sulphur dioxide. Opaque packaging that blocks out light will help maintain freshness and taste. Note that while fiber is more concentrated when a fruit is dried, vitamins A and C are often lost in the processing, so dried foods shouldn’t replace all the fresh fruit in your diet, especially not berries.

Healthy Kitchen Tip: Homemade Stock

Healthy Kitchen Nugget

Homemade Stock

Many home chefs know the value of devoting a few hours every month or so to making a large batch of chicken stock and storing it in containers in the freezer. Stock adds far more flavor than water in recipes that require a cooking liquid. But you can also make a small batch on the fly whenever you buy (or make) a rotisserie chicken or two for dinner. Here’s my hack: After enjoying all the meat, place the chicken carcass in a crockpot with a stalk of celery, a carrot or two, a sliced onion, a garlic clove, a teaspoon of mixed dried herbs, and, if you have one, a leek. Add water to cover, turn it on and, in no time, you’ll have a really nice stock. Strain it and, if you want it to be even more flavorful, reduce it in a saucepan on the stovetop.

For Your Best Health: Olive Oil Supports Heart Health

For Your Best Health

Olive Oil Supports Heart Health

Important research done at the Keenan Research Centre for Biomedical Science (KRCBS) of St. Michael’s Hospital in Toronto, Canada, has advanced our knowledge of just how olive oil helps support heart health. Scientists discovered that levels of an important plasma protein, ApoA-IV, increase as the body digests foods high in unsaturated fats, like olive oil. ApoA-IV specifically blocks a receptor on blood platelets that they need in order to clump together. Sometimes this clumping—called aggregation—is useful; however, when it results in a blood clot and blocks blood flow, it can be fatal. 

“Platelet aggregation can save lives because it can stop bleeding in damaged vessels,” explained Dr. Heyu Ni, Platform Director for Hematology, Cancer and Immunological Diseases at the KRCBS. “But we usually don’t want platelets to block blood flow in the vessels. This is thrombosis, and if vessel occlusion occurs in the heart or brain, it can cause heart attack, stroke, or death.” The research showed that higher levels of ApoA-IV can also slow down the plaque buildup in blood vessels (atherosclerosis) that stiffens their walls and also sets the stage for heart attack or stroke.

The study, published in Nature Communications, also revealed that ApoA-IV has its own circadian rhythm, and it’s most active overnight. So, according to Dr. Ni, eating foods with high unsaturated fats and following an appropriate sleep pattern together help strengthen ApoA-IV’s role in cutting the risk for atherosclerosis, heart attack, and stroke.

Fitness Flash: Persevering Over Your Inner Couch Potato

Fitness Flash

Persevering Over Your Inner Couch Potato

It’s hard to resist COVID-19’s ability to bring out the couch potato in all of us, but an expert panel from the American Public Health Association, writing in the American College of Sports Medicine’s Health & Fitness Journal, reminds us of just how important staying physically active is, precisely because of the pandemic. It’s essential to good health, especially for people with preexisting and chronic health conditions who face a disproportionate risk from the virus. Here are some of their ideas:

For cardio exercise, walk outside, staying at least six feet away from others and wearing a mask. Layer on more clothes as the weather cools—you can peel them off as you heat up. When you can’t get out, try marching in place or stepping up and down off the first riser of a staircase. Doing five-minute chunks a few times a day is a good start.

For strength training, use your own body weight to turn household tasks into exercises. Do heel raises at the sink when washing dishes, and rear leg lifts as you bend to empty the dishwasher. After a grocery run, do a set of biceps curls with large soup cans before you put them away. 

For a combo approach, between episodes of a show you’re streaming or during broadcast commercials, get in some circuit training. Take a run or brisk walk around the house, then do eight chair sit-stands, walk up and down a flight of stairs, and finish with eight wall pushups.

If you need outside motivation, find out whether your gym is offering live-streamed classes, or dip into a YouTube channel workout. 

Whenever you’re at home, think of ways to spend less time sitting and more time moving. Remember that exercise is free medicine and works body and mind, helping us cope with the stress of the pandemic and anxiety over when it will finally be in the rearview mirror.

Get More Recipes In Your Inbox!

The Olive Oil Hunter News #9

Composed Pear Salad With Port Vinaigrette Recipe, Spotlight on Pears, Anti-inflammatory Foods and Hand Workouts

When the results of a heart-health study are announced, it’s time to stop the presses. News that heart disease and stroke are linked to inflammation caused by diet lets me know that we are right on track with The Olive Oil Hunter Newsletter and my commitment to bringing you healthful recipes that taste so good, you’ll almost feel guilty for eating them! 

Details from the research are below, but the main takeaway is that one group of foods increases inflammation, while another group decreases it. This issue’s recipe includes many foods on the “good” list…

Composed Pear Salad With Port Vinaigrette

  • The Olive Oil Hunter News #9 Composed Pear Salad With Port Vinaigrette

    This dish is made for the fall, when pears are bountiful across the US. It’s also an effortless way to put together a composed salad for a brunch, a lunch or even a meatless supper with a combination of ingredients that is a little surprising…and totally delicious. While you can use poached pears or even grill pear halves just as you would bell peppers, for an elegant meal in minutes, pick a pear variety that tastes best au naturel (see the Healthy Ingredient Spotlight below to get familiar with varieties besides Bartlett). The vinaigrette is great on everything, so if you have extra, enjoy it on steamed veggies or even as a marinade for chicken breasts.

    Ingredients

    • 1/4 cup good-quality red wine vinegar
    • 2 tablespoons port wine
    • 1 tablespoon honey, preferably eucalyptus honey
    • 1/2 teaspoon salt or more to taste
    • 1/2 teaspoon coarsely ground black pepper
    • 3/4 cup extra virgin olive oil
    • 6 cups salad greens, such as mesclun or a mix of frisée, arugula and mâche, torn if needed
    • 2 ripe, unpeeled pears, such as Bartlett, Anjou, Comice or Starkrimson, halved and cored
    • 4 tablespoons Gorgonzola Dolce or another creamy and mild blue cheese
    • 1/3 cup hazelnuts, toasted and chopped
    • 1/3 cup pomegranate seeds 

    Directions

    To make the vinaigrette, add the vinegar, port, honey, salt and pepper to a blender. Turn on the machine and slowly trickle in the olive oil through the cap in the lid, processing until emulsified. Divide the salad greens among four plates. Center a pear half, cut side up, over the greens on each plate, and fill the center of each pear with a spoonful of the cheese. Drizzle a tablespoon of the vinaigrette over the pears and greens, then sprinkle on equal amounts of the nuts and pomegranate seeds.

    Yields 4 servings

Healthy Ingredient Spotlight: Pears

Healthy Ingredient Spotlight

Versatile Pears

It’s time for pears to get the recognition that their seasonal cousin apples do. A medium pear has just 100 calories, 5 grams of fiber, vitamins C and K, a smattering of minerals and zero fat. Nearly 90% of the pears grown in the US come from the three West Coast states, but Michigan, New York and Pennsylvania are also producers, along with small farms around the country.

Pears are a wonderful ingredient in many dishes, adding sweetness to a vegetable soup or being the star of a dessert like a tart, but only the firmer varieties can stand up to cooking, whether poaching, baking, grilling, roasting or sautéing. 

Among the most widely available varieties are:

Anjou Green and Red: These are great for snacking and cooking, and they’re available from fall through the following summer.

Bartlett Red and Yellow: Best enjoyed raw, these are the first pears harvested each year, but their season only goes through December. A Bartlett is ripe when the skin color changes: Yellow Bartletts go from green to yellow, and Red Bartletts go from a dark to a brilliant red. 

Bosc: Great for eating and cooking, Bosc pears are sweeter and more flavorful earlier in the ripening process. They stay firm, so they will hold up to cooking. Available until April.

Comice: Though Comice pears are traditionally green, some new strains are completely red. They’re delicious and delicate with a fragile skin—slight bruising shouldn’t affect their taste. Available through February.  

Concorde: A mix of Comice and French Conference pears, Concordes are long, tapered and elegant with dense flesh that holds its shape during cooking. Available until December. 

Forelle: One of the smallest and most limited of commercially grown pears, Forelle pears are too delicate to cook. Their skins turn bright yellow with red freckles when ripe. Available until January.

Seckel: Possibly the only truly American variety of pear grown commercially, Seckel pears are also the smallest. With olive-green skin and a maroon blush, this pear has flesh that is firm enough for cooking. Available until February.

Starkrimson: As it ripens, the distinctive crimson color of its delicate skin goes from dark to bright. Floral and sweet, it is best enjoyed uncooked. Available through November.

Unlike many other fruits, pears need to be picked well before they ripen. Left on the tree to soften, they’ll taste grainy. At home, keep them at room temperature (refrigerate only to slow the ripening process). For pears that don’t typically change color, test for ripeness by gently pressing your thumb near the stem end, or the neck, not the body. The surface should just barely give when ripe. If you want softer flesh for a purée or smoothie, wait for the wider bottom half to become soft to the touch—the inside will actually be overripe.

Healthy Kitchen Tip: Preparing Pears

Healthy Kitchen Nugget

Preparing Pears

A great way to enjoy pears is to poach them in a highly flavored liquid. The pear will pick up the essences of the other ingredients you use and, once cooked, will keep in the fridge for up to a week in the poaching liquid. The best pears for poaching are the smaller Seckel and Forelle and the larger Bosc and Concorde. Keeping on the stems makes them more elegant if you’re serving them whole.

Here’s the basic technique for poaching pears: Gently peel them with a vegetable peeler, giving each pear a squeeze of lemon juice as you go to avoid browning. Place the peeled pears in a saucepan that will hold them snugly without crowding them. Add your chosen spices and enough liquid to completely cover the pears—you’ll need about 4 cups of liquid for 6 to 8 pears. To protect them further, place a round of parchment paper over the tops of the pears during cooking. Bring the liquid to a simmer and cook for about 20 minutes, or until a knife easily goes into the flesh. Let cool. You can store the pears in their liquid or, if you’re serving them right away and want a simple sauce, remove the pears and any whole spices from the saucepan and vigorously boil down the liquid until it’s reduced to a syrup.

Experiment with any spices and flavors you like. Here are three combinations to try:

  • Mulled Spice: Use 3 cups apple cider or juice, 1 cup water (more if needed), 2 cinnamon sticks, 8 black peppercorns and 1/4 teaspoon each nutmeg and allspice.
  • Purple Beauty: Use 3 cups port, red wine or cranberry juice, 1 cup water (more if needed), the peel of an orange or lemon, 2 cloves and 1 cinnamon stick.
  • Golden Beauty: Use 3 cups fruity white wine, 1 cup water (more if needed), 1 cinnamon stick and 1 vanilla bean, split, or 1 teaspoon vanilla extract.
For Your Best Health: Anti-inflammatory Foods

For Your Best Health

Anti-inflammatory Foods

You’ve probably heard some foods described as “pro-inflammatory”—they increase levels of unwanted and unhealthy inflammation within the body. A landmark study just published in the Journal of the American College of Cardiology, one that included 210,000 Americans, has found that a diet high in such foods has been linked to an increased risk for our number one killer: cardiovascular disease, or CVD. Inflammation lays the groundwork for high blood fats and deposits on artery walls, clogging those arteries and setting the stage for heart attacks and strokes. 

Turns out that people who ate a more pro-inflammatory diet—lots of red, processed and organ meats; refined carbohydrates, including sugars; and sweetened drinks—had a 38% higher risk of CVD compared with people who ate an anti-inflammatory diet. The findings held true for men and women, including people who were at a normal weight.  

Eating more anti-inflammatory foods can be a winning strategy to help prevent CVD. Reviewing this study and other recent studies, an editorial panel writing in the same issue of the journal outlined top foods to put on your menu: green leafy vegetables like kale, spinach, cabbage, watercress, romaine lettuce, Swiss chard, arugula and endive; yellow vegetables such as carrots, pumpkin and yellow peppers; tomatoes and other fruits like blueberries, pomegranates, oranges, cherries, strawberries, apples and pears; whole grains, including wheat, oat, rye, buckwheat and millet; walnuts; extra virgin olive oil; fatty fish; and coffee, tea and wine, all rich in antioxidants.

Fitness Flash: Hand Exercises

Fitness Flash

Hand Workouts

Do you take your hands for granted? Think of all they do—cooking included!—and show them a little TLC. Exercises from Keck Medicine at the University of Southern California can help with stiffness and pain, too. Here are two to get you started: 

Hold a soft ball in one palm, squeezing as hard as you can without causing pain. Hold 3-5 seconds, then release and switch hands. Work up to 10-12 reps with each hand. Repeat every other or every third day. 

Make a gentle fist with each hand, wrapping your thumb across your other fingers. Hold up to one minute, then release and open your fingers, spreading them as wide as you can. Repeat 3-5 times with each hand. 

If these exercises cause discomfort or if you have chronic hand pain, check in with your doctor for an evaluation.

Get More Recipes In Your Inbox!

The Olive Oil Hunter News #8

Roasted Squash and Sage Risotto Recipe, Spotlight on Squash, The Power of Soy and Exercise and Depression

As fall’s chill takes hold, it’s time for stick-to-your-ribs meals and taking advantage of farmers’ markets bursting with the seasonal bounty of winter squash. This issue of The Olive Oil Hunter Newsletter has everything you need to cook up a storm…

There are a few tricks of the trade I want to share so you’ll avoid common risotto speed bumps. The first concerns the rice. A short-grain rice is a must for getting the texture just right—the longer jasmine or basmati styles just don’t give off enough starch. Most risotto recipes designed for the American kitchen call for arborio, a great choice. But Italians, who are understandably very particular about the rice they use, prefer Carnaroli rice because it keeps its shape better—it’s harder to overcook, making your risotto more foolproof as well as light and creamy. Now, just to make things more interesting, over in Venice, the favorite is Vialone Nano, grown only in the province of Verona. It, too, stays firm while creating a light and creamy dish. So, it’s a matter of preference. Gustiamo.com sells both kinds if you’d like to do your own taste test! Whichever rice you choose, do not rinse it—you want its starch intact.

This tip is simple but essential: The cooking liquid, usually broth, must be kept hot in a second pot on the stove so that the temperature of the risotto stays consistent as you ladle in the liquid. And now for something I find is really helpful, though it’s not traditional—I prefer to use a small metal spatula with a straight, blunt edge to stir the risotto because it makes better contact with the pan than a spoon. 

For this recipe in particular, roasting rather than boiling the squash adds extra depth without adding any extra cooking time. The Healthy Kitchen Nugget below has everything you need to know about the prep.

If you want to watch the doyenne of Italian cooking, Lidia Bastianich, making risotto before you begin, she has a video master class with Fortunato Nicotra, her executive chef at Felidia in New York. It features great techniques and an exotic beet risotto recipe.

Roasted Squash and Sage Risotto

  • The Olive Oil Hunter News #8 - Squash Risotto Roasted Squash and Sage Risotto

    Risotto is a time-honored classic from Milan, in northern Italy, where the culinary emphasis is on dairy, unlike the tomato-based dishes of the south. It’s labor-intensive because you must slowly add liquid to the rice and stir constantly to coax it to creamy perfection. Risotto is an impressive dish for entertaining, but you want to have the technique down first. While you don’t want to make your first risotto when company’s coming, it can be mastered quickly, and once you know the basics, you can start to experiment with different ingredients—shrimp, wild mushrooms, peas and leaks…risotto is infinitely customizable.

    Ingredients

    • 1-1/2 pound squash, such as Hubbard or kabocha 
    • 5 tablespoons extra virgin olive oil 
    • 3 large fresh sage leaves, finely minced 
    • 1 leek, trimmed, cleaned and thinly sliced crosswise 
    • 5 to 6 cups chicken or vegetable stock, homemade or low-sodium canned 
    • 1-1/2 cups rice, such as Carnaroli, Vialone Nano or arborio
    • 1 cup dry white wine, warmed
    • Pinch of nutmeg
    • 1/2 cup freshly grated Parmigiano-Reggiano, plus more for serving
    • 5 ounces baby spinach, rinsed and patted dry with paper towel
    • Salt and freshly ground black pepper 

    Directions

    Step 1

    Preheat the oven to 400 degrees. Peel, seed and cut the squash into 1″ cubes to make 2 cups (if your yield is higher, roast them all and save the overflow to toss in a salad the next day). Place 2 tablespoons of the olive oil on a rimmed baking sheet, add the squash and sage and toss to coat. Bake for 30 minutes or until tender, flipping them with your metal spatula at the halfway point. 

    Step 2

    Meanwhile, heat a large, heavy sauté pan over medium-low heat and add the remaining 3 tablespoons of olive oil. Add the leeks and sauté them until soft, but don’t let them color. While they’re cooking, heat the stock in a saucepan. Once the leeks are soft, immediately add the rice to the sauté pan and stir to thoroughly coat with the oil. Cook until the rice is slightly translucent, about 7 to 10 minutes. Increase the heat to medium, add the wine and nutmeg, and stir until the liquid has nearly evaporated. Ladle a cup of the hot stock into the rice mixture and stir attentively. When the liquid has mostly been absorbed, stir in another cup of hot stock. Repeat until the rice is nearly al dente, about 15 to 20 minutes. Stir in the 1/2 cup of Parmigiano-Reggiano, the roasted squash and the spinach. Cook for 3 to 5 minutes, until the squash is warmed through and the spinach is wilted. If the risotto seems a bit dry, add a little more stock. Season to taste—the risotto might taste salty enough from the cheese, but add a few twists from your pepper grinder. Top with more grated cheese and serve immediately.

    Yields 4 main course or 6 side dish servings.

Healthy Ingredient Spotlight: Ode to Squash

Healthy Ingredient Spotlight

Ode to Squash

Pumpkin might steal the spotlight for holiday pies, but winter squashes get the glory for sweet side dishes without the need for sugar. Many varieties can be as satisfying as sweet potatoes, plus they have all the wonderful nutrients of orange veggies, like vitamin A, with fewer calories. They have great taste on their own but will also benefit from spices and herbs you like. Here are some of the best:

Acorn
The yellow flesh of this small round, ribbed squash is more savory than sweet. Look for mostly green skin—too much orange means it’s past its prime. 

Butternut
This cream-colored squash with a rounded bottom and long neck has sweet orange flesh. 

Delicata
Oval in shape with light yellow and green stripes, this squash has yellow flesh and a mild flavor. 

Hubbard
With its gnarly, pale blue-green skin and large size, you might overlook this variety, but its orange flesh is rich and sweet. (There’s also a Hubbard variety that’s small and orange.)

Kabocha
Available in dark green or red, kabocha is among the sweetest of squashes—a great change of pace from pumpkin in desserts. 

Spaghetti
Milder and lighter in color (both the rind and the flesh) than other types, this squash separates into thin spaghetti-like strands when raked with a fork after roasting, making it the perfect sub for pasta. 

Sweet Dumpling 
This one’s close in size to acorn squash but has a much sweeter taste, plus the skin is thin enough to eat. 

Regardless of variety, a squash should feel firm and be free of soft spots and bruises. Most will keep up to a month or two in a cool, dry location.

Healthy Kitchen Tip: Easy Prep Squash

Healthy Kitchen Nugget

Easy Prep Squash

For a quick hack, I love buying precut squash chunks because most varieties have thick skin that can be difficult to deal with. But I don’t want you to be deterred from buying whole squash at a farmers’ market or even growing your own. Here’s a great and easy prep. 

Use a sharp paring knife (dull knives are a real danger in the kitchen) to make a 1/8″ deep cut around the circumference of the squash in the right direction to later halve it, and then pierce it all over just as you would a sweet potato. Place it on 5 or 6 sheets of paper towel and microwave it—3 minutes for a small squash, 5 minutes for a large one. This won’t cook it, but it will make it easier to cut. Use oven mitts to remove the squash from the microwave, and let it cool for a few minutes before proceeding. 

If you need cubes for a recipe, use a vegetable peeler to remove the skin at this point, but if you’re ultimately making a purée or soup, leave on the skin for roasting—it will come off very easily afterward. 

Now use a sturdy kitchen knife to go through the cut line you made earlier to separate it into halves. With a soup or grapefruit spoon, scoop out all the strings and seeds and proceed with your recipe. Note: When roasting squash halves, always place the cut side down.

Bonus hack: Turn squash seeds into a fast snack! Rinse them off, use paper towels to absorb the excess water, spread them out on a cookie sheet lined with parchment paper, sprinkle with your favorite herbs or spices, and bake at 350 degrees for 10-15 minutes until brown and crispy.

For Your Best Health: The Power of Soy

For Your Best Health

The Power of Soy

One of the most-studied foods is soy, and research shows that it belongs on the menu whether you’re following a plant-based plan or simply want a nutritious meat alternative to include in your diet. Whole soybeans, including edamame, and foods made from soy, such as tofu, miso, tempeh and natto, are rich in nutrients called isoflavones. A study published in March 2020 in the journal Circulation found that people who ate at least one weekly serving of tofu or another isoflavone-rich food had up to an 18% lower risk of developing heart disease compared with 12% for those who ate these foods less than once a month. Other research has found that it can help you stay vital as you age and, according to a report by the Physicians Committee for Responsible Medicine, eating soy may help prevent cancer, including breast cancer in women and prostate cancer in men—you can read more details here

Though soy is the richest source of isoflavones, they’re also in alfalfa, chickpeas, beans and pistachios, so make these foods part of an overall healthy diet.

Fitness Flash: Physical Activity and Depression

Fitness Flash

Physical Activity and Depression

We’ve all heard about the feel-good chemicals called endorphins that kick in during exercise, but the effects of working out could go even deeper. An international team of researchers writing in the American Journal of Psychiatry looked at dozens of studies on the link between physical activity and depression and found that people with higher activity levels had lower levels of depression than people who are fairly sedentary—this connection held true for men and women, young and old. We don’t know the full explanation, but it’s due at least in part to the fact that exercise reduces physical risk factors, like inflammation, and increases protective factors like self-esteem. Until we learn whether there’s a magic amount of exercise needed, aim for the 30 minutes a day on most days of the week suggested by leading health organizations.

Get More Recipes In Your Inbox!